
Maps are a great feature to include in your WordPress blog posts that are location-specific. They provide a visual reference for readers. For example, if you are writing a review on a restaurant, it would be helpful to include a map of that restaurant. Follow instructions below to learn how to insert maps into a WordPress blog post.
How to Insert Maps
In order to have a mapping feature on your WordPress website, you must have a mapping plug-in. Contact your web developer for information on available plugins that are compatible with your site configuration. Below are instructions for the mapping tool included in websites created by Lanergy Solutions.
- Place your cursor on a blank line where you would like the map inserted.
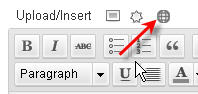
- Click on the map icon in the toolbar.
- A pop-up will appear that displays your existing maps.
- To insert an existing map, click on the link below the desired item on the list.
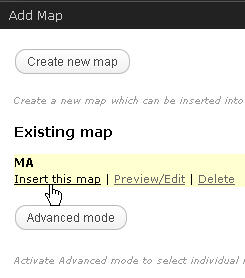
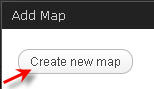
- To create a new map, click CREATE NEW MAP.
- Enter the desired location. This can be a state, town, or exact address.

- Click ADD.
- Enter a name for this map. This name will appear in your list of maps.

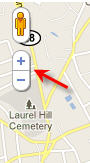
- Zoom in or out in the map (using the plus and minus buttons to the left) until the map appears as you would like.
-
Click the blue SAVE button. This adds your map to the list of available maps.

-
Click the INSERT button.

- In your blog post, you will see a short code that looks like this: [map id=”1″].
This is where your map will appear once you publish your blog. - To preview what your post will look like with the map included, click on the preview button in the upper right hand corner of the page.
Note: Your particular mapping tool may have a different set of steps for how to insert maps into your WordPress blog post. Consult with your WorPress administrator for details. The instructions above apply to the tool used by Lanergy Solutions.

