
If you have multiple photos for display in your blog post, displaying those photos in a gallery layout will ensure that the image sizes are consistent and are aligned properly on the page. You can designate the number of columns to display in that gallery. The number of rows will be determined by the number of photos that you upload. Galleries will display all photos uploaded to the particular blog post. Below are step-by-step instructions on how to insert a gallery of images into a WordPress blog post or page.

How to Insert a Gallery of Images
- Place your cursor on a blank line where you would like the gallery to appear.
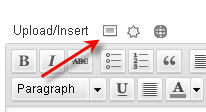
- Click on the Upload/Insert icon.
- Upload all of the images that you would like included in the gallery.
- Click on the Gallery tab near the top of the pop-up window.
- All images uploaded for this blog post will appear in the gallery within the blog post. Delete any undesired images.
- To set a particular order for the images, place a number in the box next to the SHOW link for each image on the list and click SAVE ALL CHANGES at the bottom of the list.
- Gallery Settings appear at the bottom of the window. Change settings (i.e. number of columns) as desired.
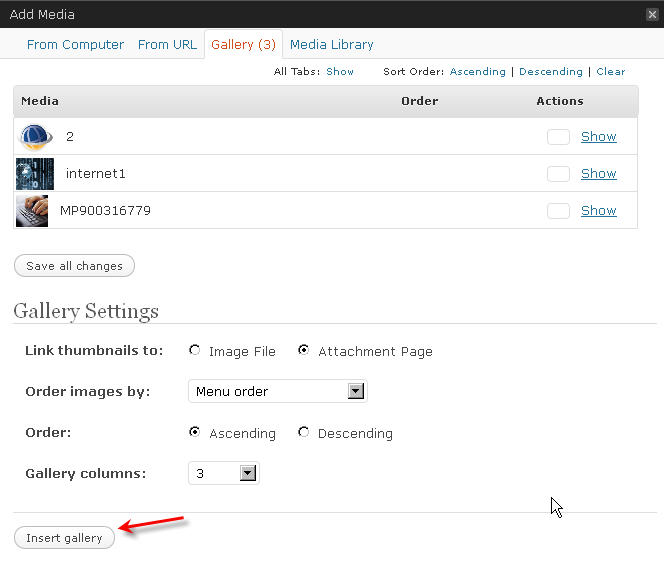
- Click Insert Gallery button.
- A placeholder for the gallery will appear in the blog post. This is all you will see on the backend of the website.

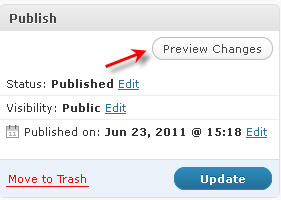
- To view what the gallery will look like once the post is published, click the Preview Changes button in the Publish area.
Summary of Image Galleries
Image galleries are particularly important for blog posts that contain a large number of photos as they allow you to easily add all listing photos in a nice grid without having to insert and align each one. The images are automatically re-sized and appear in the order that you designate. Uploaded images can also be used in a slide show within the blog post. Now that you have learned how to insert a gallery of images into a WordPress blog post, give it a try!

